Animation + VFX
Digital Matte Painting
Original Image - taken using a Canon 300D

Graded Image, edited using Adobe Photoshop

Final Render
VFX Project - Pepsi Can
For this project, I modelled a Pepsi can from scratch in Maya. I made the shaders from scratch using photoshop, and textured the can using Arnold. I then went on to light the scene to match the outdoor background I had chosen to ensure the can does not look out of place.
To achieve the effect of the can interacting with its environment, I modelled dummy geometry for the pole and the floor. I used the gravity effect in Maya to drop the can into the scene and bounce off the pole and onto the floor. I edited its mass and bounce attributes in Maya to match the reference video I filmed.
I then rendered the passes and put them into Nuke, where I further edited the lighting and reflections of the can and added motion blur to further enhance its realistic look.
Final Major Project
Bourne Water Dragons Charity Brief
I have also worked on a short promotional animation for the charity Bourne Water Dragons, which helps recovering cancer patients. We were given a short brief by the charity outlining the story and key points they wanted us to include, but had visual and creative freedom with the style of the animation. I was responsible for the storyboard, animatic and shared the modelling, rigging, animation roles with one of my peers.
While working remotely during the pandemic was challenging, we managed to adapt our communication skills to overcome this barrier using video calls and a shared online group schedule. Overall, I was happy with the outcome, and really enjoyed seeing all our specialisms come together to produce a short film with an inspiring message.
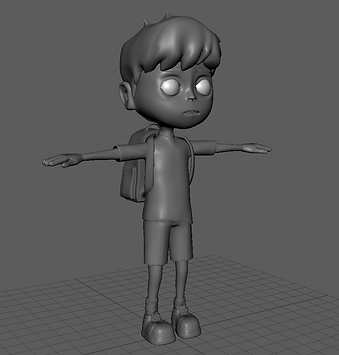
Character Model
For my Final Major Project this year, a peer and I are working on a short film which we are hoping will inspire environmental action from our audience.
I was responsible for designing and modelling the protagonist 'Kit'. We went with a stylised look for the piece overall, so it was important that this design will transfer well to a 3D model.


My final design for 'Kit' that I used as reference for the model

We decided against having speech in our film, as it has an important message that we want to reach as large an audience as possible, and so did not want to restrict it to one language. As a result, we are heavily relying on clear facial expressions to convey emotion, and thus it was imperative that the face topology was correct so that it rigs well.
I modelled this entirely in Maya, using the modelling and sculpting tools.
This was my first character model and I am very happy with how it turned out. I like the how the stylised face, enlarged hands and shoes translated into 3D, which I feel gives the character a memorable look.
If I had more time on this part of the pipeline, I would have added some more details to his clothes, to further bring out his personality. However, I tried to do this as much as I could, through staying true to his scruffy hair, and dishevelled socks and shoes.


Previsualisation - Framestore Industry Brief
We were provided with a brief from Framestore that required us to come up with a story that featured a chase scene and an object of interest. They provided the assets and we were tasked with completing a storyboard, animatic and final previsualisation for our story.

I used this mood-board to gain inspiration for the lighting and tone of my story. It helped me to visualise how I wanted to use lighting to convey a story.
This is a section of the storyboard I completed to visualise my plot. This helped me gain a feel for the flow and order of the story, as well as establish some initial camera angles that i wanted to include. I also personally found it useful to produce a shot list based on this storyboard to help further organise the main beats of the story.

I began with blocking out the key poses within the animation and they key shots that I wanted to include. I then received feedback from my peers and tutors, and worked on refining the ordering of my story. Once I was happy with this, I could refine the animation slightly, and adjusted and added shots accordingly. I finally added some warm lighting to mimic a sunset and put the shots together for the final previsualisation.
This was the final previsualisation for the story, complete with some basic animation and mood lighting, all completed in Maya.
I am happy with how this project turned out, as I think it successfully portrays the light-hearted and funny yet romantic tone I aimed for. I think the story is well-structured and is clearly visualised within the animation.
I think it can be elevated with some more exciting shots, and would love to further develop my cinematography skills.
Rigging in Maya
For this project, I rigged the head, neck, torso and arms of a 3D polygonal human model using a combination of Maya's python script editor and node editor.


The rig is equipped with:
- an IK/FK switch attribute to allow the user to switch between the two when animating.
- a fully organised outliner for ease when looking for an object
- locked layers to avoid accidental translations
- a volume preservation feature within the torso to help with accurate squash and stretch when animating
- clear and colour coded animation controls that control their allocated portions of the body
I experimented with skinning, in which I managed to fully skin the neck
I also experimented with creating tools using expressions. I created two tools for the arms to allow them to be returned to a bind pose to prevent any unwanted rotations or translations